Let’s face it; decent lenses are expensive. Sure there are cheap lenses out there, but as the saying goes “you get what you pay for”. Either they are new lenses that are designed to be as cheap as possible at the expense of image quality (often having plastic lens elements) or used lenses that have been thoroughly abused. Sitting on the floor under my desk is a box filled with over a dozen old lenses purchased for no more than 3 bucks, the cheapest of which cost less than a dollar (It really shows!) waiting to be harvested for parts.
But there is another way!
I’m going to show you how I designed and 3D printed a ~90mm f/2.2 lens for Nikon F and Canon EF mount cameras for right around $20. I’ll even share the files with you so you can make your own! (but only if you’re good)
What You’ll Need:
2 cemented achromat lenses
The elements I used for this lens are a 42mm DIA x 145mm FL. for the front and a 31.7mm DIA x 175mm FL for the rear. Both purchased from Surplus Shed.
Cost: $15.50 + Shipping
A 3D printer (duh)
My printer is a Prusa Mk3s MMU2s. You Don’t need a fancy printer for this, though the multi-material capability is nice for adding accent colors and text.
Black filament is preferred (at least for the internal parts) to reduce internal reflections.
I used PLA but ABS or ASA would probably be better
Jewelers files and sandpaper
Harbor freight files work just fine.
Use 220 and 400 grit sandpaper.
Some grease for the focusing mechanism
Superglue or epoxy
Designing the Optics
Using a program called OpticalRayTracer I created lens groups with the same diameter, edge thickness and focal length of the actual lenses I had to figure out the necessary spacing between the 2 groups, the distance to the image sensor, and the room needed for focusing. This step was pretty easy and gives a really good idea of how the lenses need to move to produce an image.
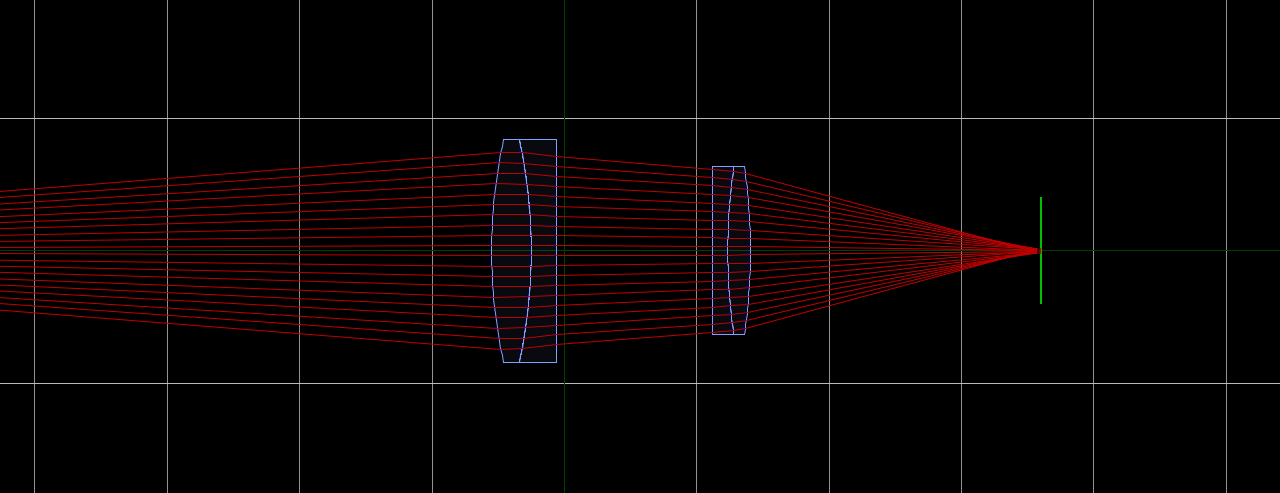
Final layout with ray tracing
Designing the Housing
This step was not nearly as quick or easy as determining the spacing for the elements, and took up a couple weeks working a few hours every day. The hardest and most time consuming part was figuring out just how everything should work together, so if you decide to design a lens of your own hopefully you can save a few hours (and headaches) using what I’ve come up with here.
Open up whatever CAD program makes you happy. Solidworks, Fusion 360, even TinkerCAD if you’re feeling particularly masochistic. The first thing I did was draw the image sensor, mounting flange and lenses in their proper relative positions.
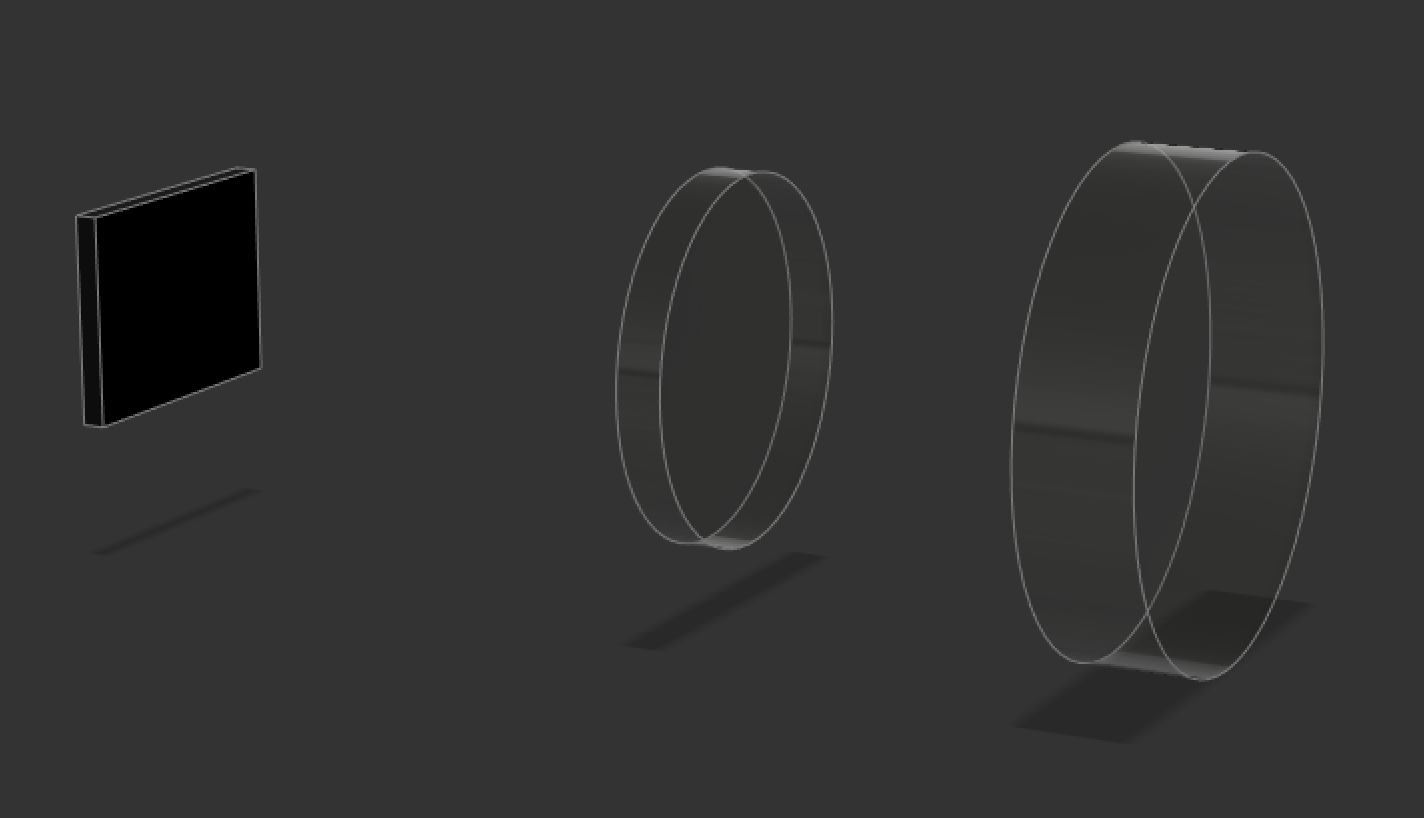
Sensor and lenses modeled in CAD
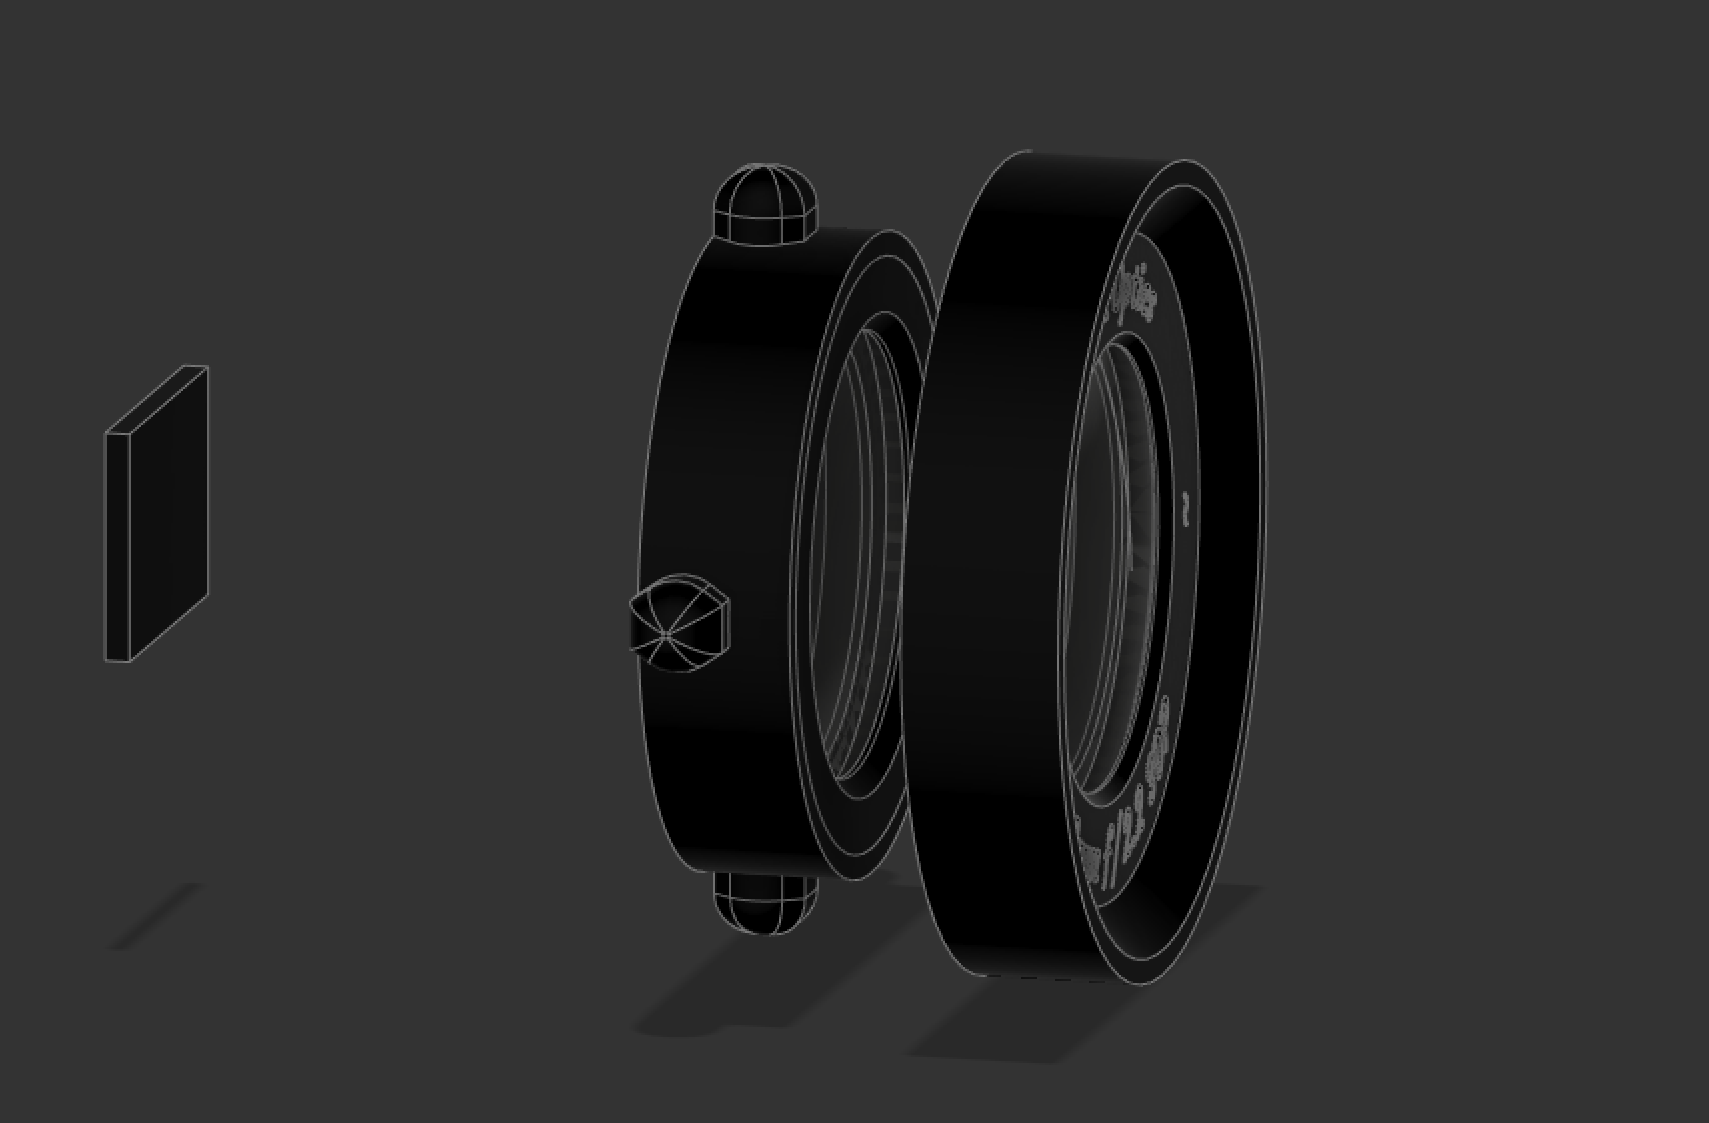
I then created rings that fit around the lenses with caps to hold them in place.

Initial lens mounting rings modeled. These will change many many times…
The lens mounts were refined somewhat and I added alignment nubs to the focus carriage. At this point I also added text to the front of the lens that reads “Bohm Optics ~ 90mm f/2.2 3DP”. I like it when people put their names on things they’ve created, it shows that you’ve made something that you are proud of.
Focus carriage designed and mounts enlarged
I then designed the outer housing of the lens. This will be what turns to drive the focus carriage as well as sealing out any stray light. I added the accent ring to the front purely to increase the bling factor.

Outer housing roughed out
Next I added a cage structure between the housing and the focus carriage. For lack of a better term I have called this part the focus stator as it prevents the focus carriage from rotating, not entirely unlike the stator vanes in a jet engine which prevent the compresses air from rotating. The stator also acts as the primary structure of the lens.

The focus stator with grooves in which the nubs of the focus carriage ride.
At this point the focus carriage has a guide in which to move but nothing to actually drive it. To do this I added helical grooves to the outer housing with the same profile as the carriage nubs.
Grooves modeled for the focusing mechanism
Next I created the lens mount. I’m primarily a Nikon shooter so I created a mount for Nikon F cameras. This lens is compatible with my D810A as well as all of my Nikon film SLRs from the Nikkorex F made in the early 60’s to the F5 made in the mid 90’s. It also works with an adapter on my two full spectrum Sony NEXs but isn’t very useful as I haven’t yet added filter mounting rings.

Mounting flange, with a groove for the detente pin and an alignment mark
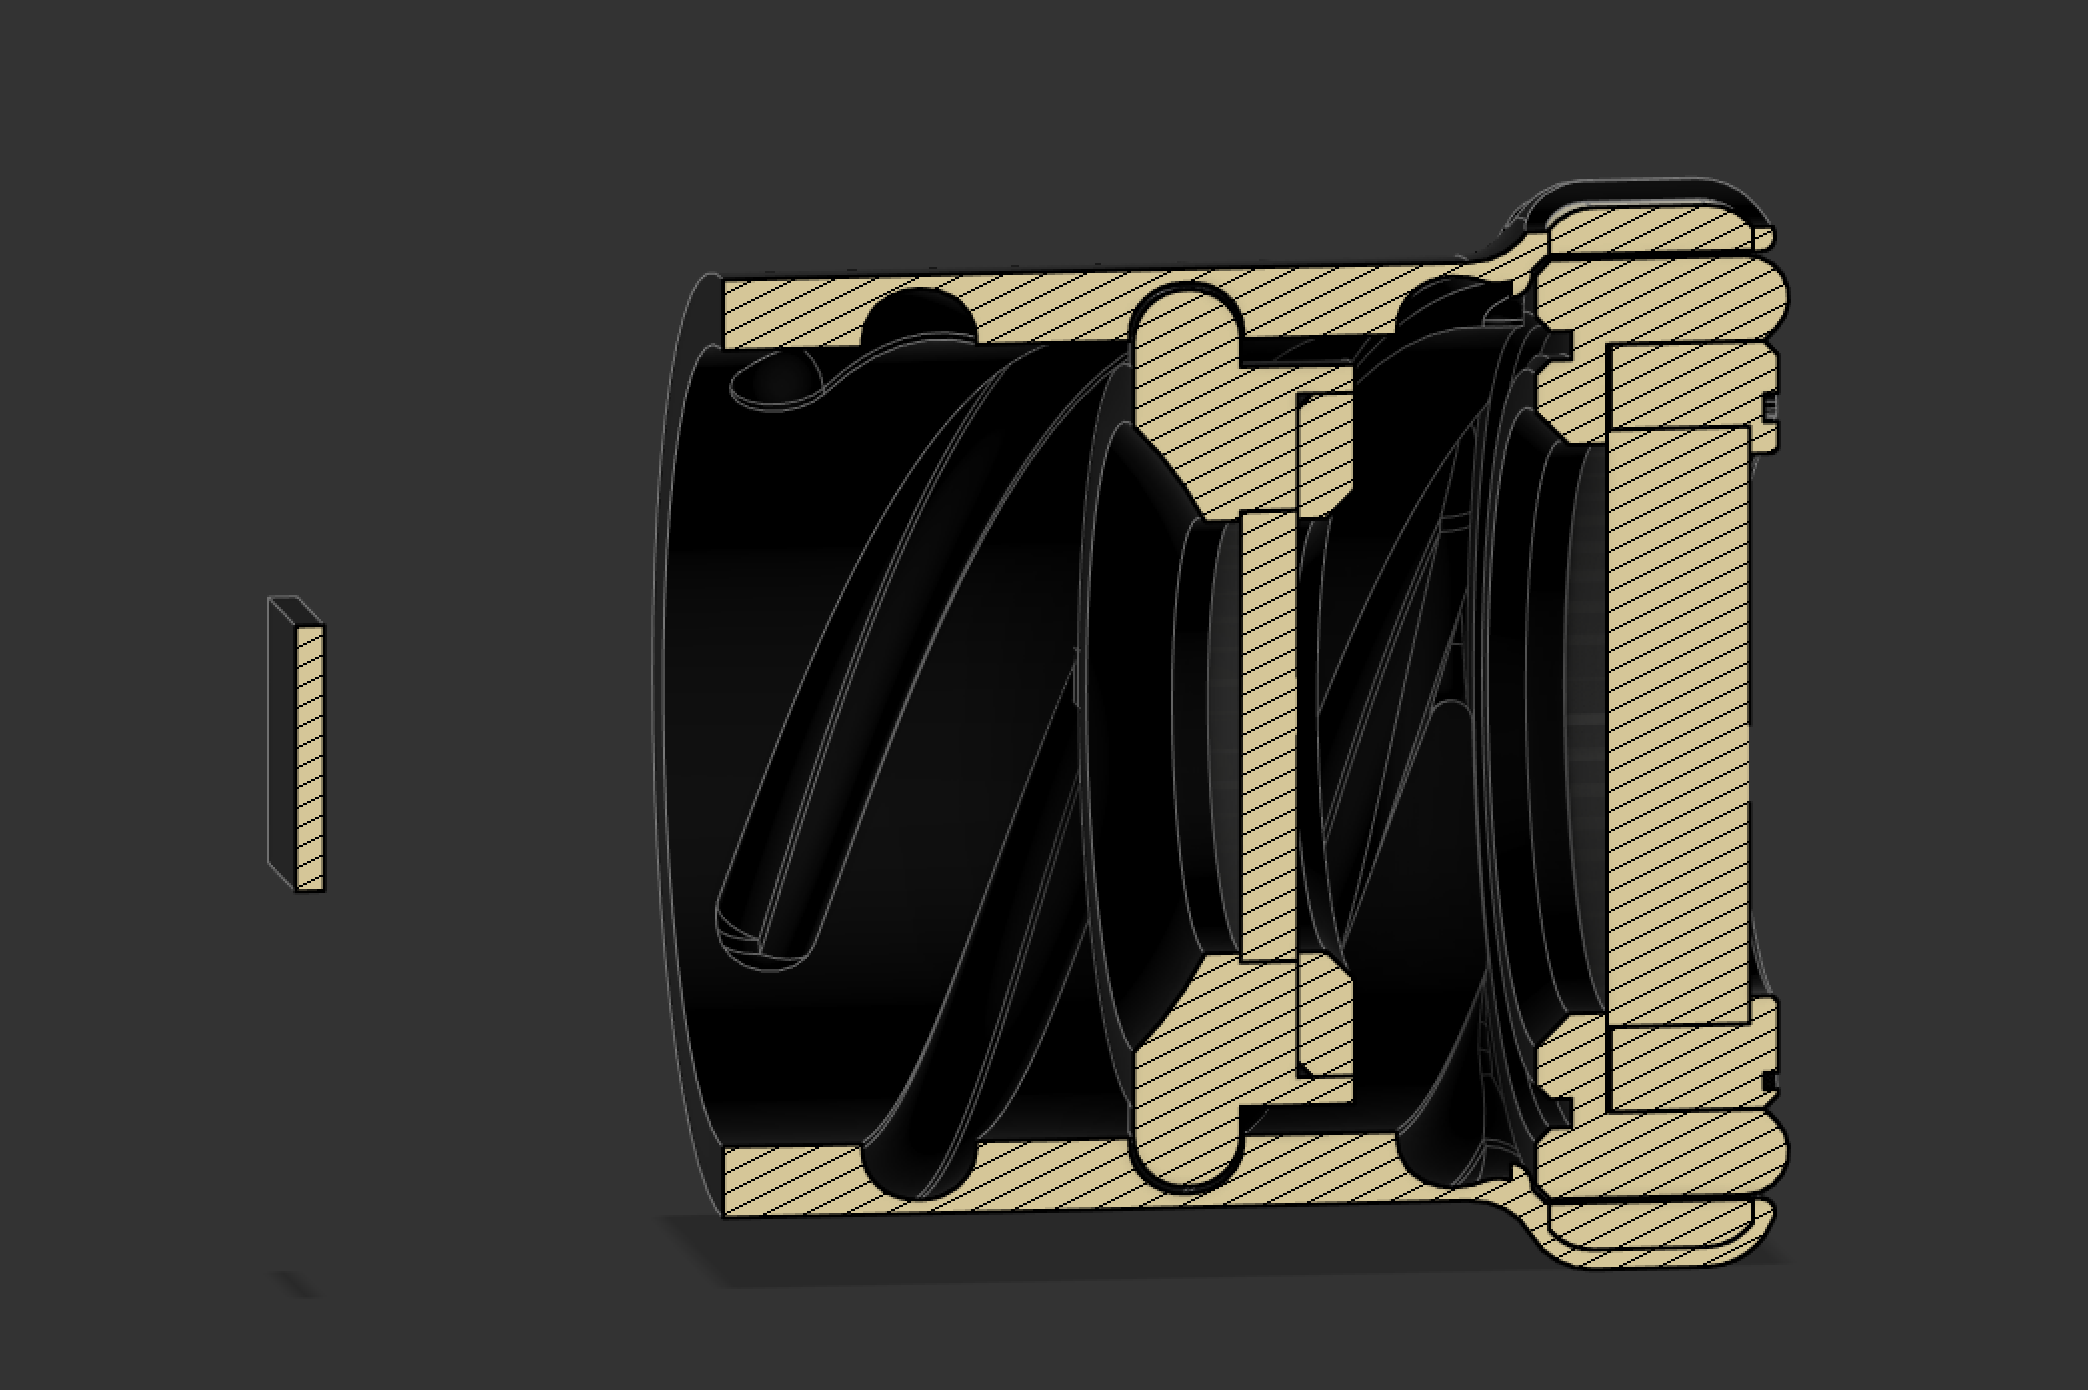
The design is now complete. Here’s a cutaway view of the entire assembly to show how everything fits together:

Cutaway of the final design with many small tweaks, most notably a redesign of the focus carriage to allow for infinity focusing
Printing the Lens
The parts were exported from CAD and imported into PrusaSlicer. Supports shouldn’t be necessary, the focus nubs might have some stringing but they’ll get cleaned up with a file anyway. I printed the front element retaining ring separately with a smaller nozzle to get better results with the text.

Sliced and ready to print
After a few print failures I was ready to be done and didn’t take any pictures during fitment and assembly. You aren’t missing much though, just imagine a lot of test fitting, sanding, and swearing. Eventually the pieces should fit nicely and slide smoothly without rattling. I glued the closed side of the focus stator to the front mounting ring then added some white lithium grease to all the sliding surfaces. After adding the lens to the focus carriage and putting it in its place I threaded on the housing with the helical grooves and press fit the lens mount onto the back. By mounting the lens on a camera I was able to align the body so that the text on the front was properly aligned. I then carefully dismounted the lens from the camera and put a few drops of thick superglue between the stator and mount using a bent piece of wire, making sure to get the glue down into the groove being careful not to get any on the outer housing. A quick spritz with accelerator prevented any superglue vapors from fogging the optics.

The finished lens, mounted on my Nikon N90 film SLR
Test Shots
This is where we finally get to see the fruits of weeks of labor. The suspense is tremendous. The lens could totally suck and all that hard work could be for nothing, yet it also has the potential to be absolutely fantastic. The image quality of any lens is subjective, so I’ll let you be the judge.

Our dog Maggie digging in some blankets
At f/2.2 and lacking any sort of diaphragm to stop down the depth of field is razor thin. Being based on a Petzval design the lens also shows quite strong field curvature, with the sharpness falling off dramatically towards the edges. Overall the lens produces a ‘dreamy’ sort of look that I think could work quite well for some shots.
I decided to say “It’s a feature, not a bug” and leaned into the low-fidelity characteristics of this lens, shooting a roll of expired Kodak max 400 with it which I developed myself. Here are what I consider to be the highlights of the roll:

Notice how the sharpness falls off away from the center of the image, with the powerlines nearly disappearing in the corners

This suitcase contained only a garden hose in case you were wondering…

Another shot of Maggie. She almost never poses for the camera like this

I’m not into bird watching, I just think crows are neat

A local art installation. Such a powerful statement about the current geopolitical climate…

I like shooting with this lens so much that I even took a selfie. I NEVER take selfies, in fact this might actually be my first
This lens is definitely not going to be used for general purpose photography, but for me it gets a pass and I look forward to using it more in the future.
When I was ordering the lens elements for this project I bought a second set expecting to damage at least one at some point. I managed to avoid breaking anything and so I decided to make a second lens for a friend of mine. He shoots with Canon so I designed an alternative EF mount for the lens.
If you would like to make one for yourself I have made the files available to download for free with the following links (Prusaprinters - Myminifactory). If you do make one please share your photos!
Thanks for reading,
Jackson Bohm
Post Script
I firmly believe that listening to music while working on a project is vital to its completion. Normally I would love to suggest a band that I enjoyed listening to during a given project, but with how long this one took that would end up being an entire playlist. That said, I did listen to quite a bit of Insomnium while grinding my way through the CAD drawings. The sadness in their music balanced out the ever increasing rage caused by endless errors and dead-ends to create a vague sense of general irritation that I found strangely motivating.
Edit:
To make the lens more usable I have modified my copy with a collapsible front lens hood (with threads to attach filters) and a 30mm filter ring to the focus carriage to add interchangeable apertures. Aperture disc files have been added. To calculate the f-stop of an aperture disc multiply the area of the rear lens element by ~2.5 then divide that number by the total area of the opening in your aperture disc. Apertures do not need to be circular and will impart their shape onto the bokeh of the image. I have included a couple of my more "creative" apertures as examples (the star works very nicely, the fighter jet not so much…)
These are the parts I added:
https://www.bhphotovideo.com/c/product/1388613-REG/sensei_lhr2_t55_55mm_3_in_1_rubber_lens.html use step-up/down rings to whatever size filters you use.
https://www.bhphotovideo.com/c/product/171194-REG/Tiffen_30UVP_30mm_UV_Protector.html Unthread the retaining ring and remove the glass (careful, the edges of mine were quite sharp).
I attached the parts with 5 min epoxy. The lens hood slots between the front flange and retaining ring quite nicely, and I simply ran a bead of epoxy around the outside to avoid getting epoxy near the glass. For the rear filter ring I smeared a layer of vaseline on the rear lens element (avoiding getting any on the plastic) and applied a bead of epoxy around the outside of the ring to fix it to the focus carriage with the female threads facing out. The vaseline is easy to remove with a few cotton swabs soaked in alcohol.